Let's build a chat with ActionCable

Update February 8th, 2016: As mentioned in the post below, ActionCable was under heavy development at the point of writing. As is the nature of such things, some of the setup instructions are no longer necessary. ActionCable does not need a concurrent server like Puma. Instead it makes use of the new Rack socket hijacking API. We are working on updating the instructions below - for an up to date tutorial please check How to Deploy ActionCable and Rails 5 To Production.
We will introduce the concepts of ActionCable first, followed by a small tutorial on how to build a chat application using Rails 4.2 and a current version of ActionCable. You may follow along at home or have look at the finished product on our Github.
Note that the shown APIs may and probably will change until the official release.
Websocket Concepts
The basic protocol that is pervasive in browser server interaction is HTTP. This is the protocol that gets used when a browser asks for an HTML page, JavaScript or CSS assets.
An HTTP connection is typically short-lived, initiated by the browser and ends when the application server has returned a response. This poses a problem given an event that browsers need to know about, but have not asked for - the server has no way to send data to the browser unasked.
Before websockets, developers have opted for polling loops or long-running http requests (ActionController::Live) to solve such cases, both of which have their own technical difficulties.
Websockets enable browsers and application servers to keep an open connection, enabling both parties to initiate sending data to each other. Given a websocket connection, a server will send an event message to the browser through an open websocket connection, enabling direct interaction between events on a server and the browser.
ActionCable Architecture and Concepts
Traditionally, the websocket way of handling connections did not integrate well into a Rails application - the process of handling a request in Rails is fundamentally aligned with the request-response-end way HTTP connections are handled.
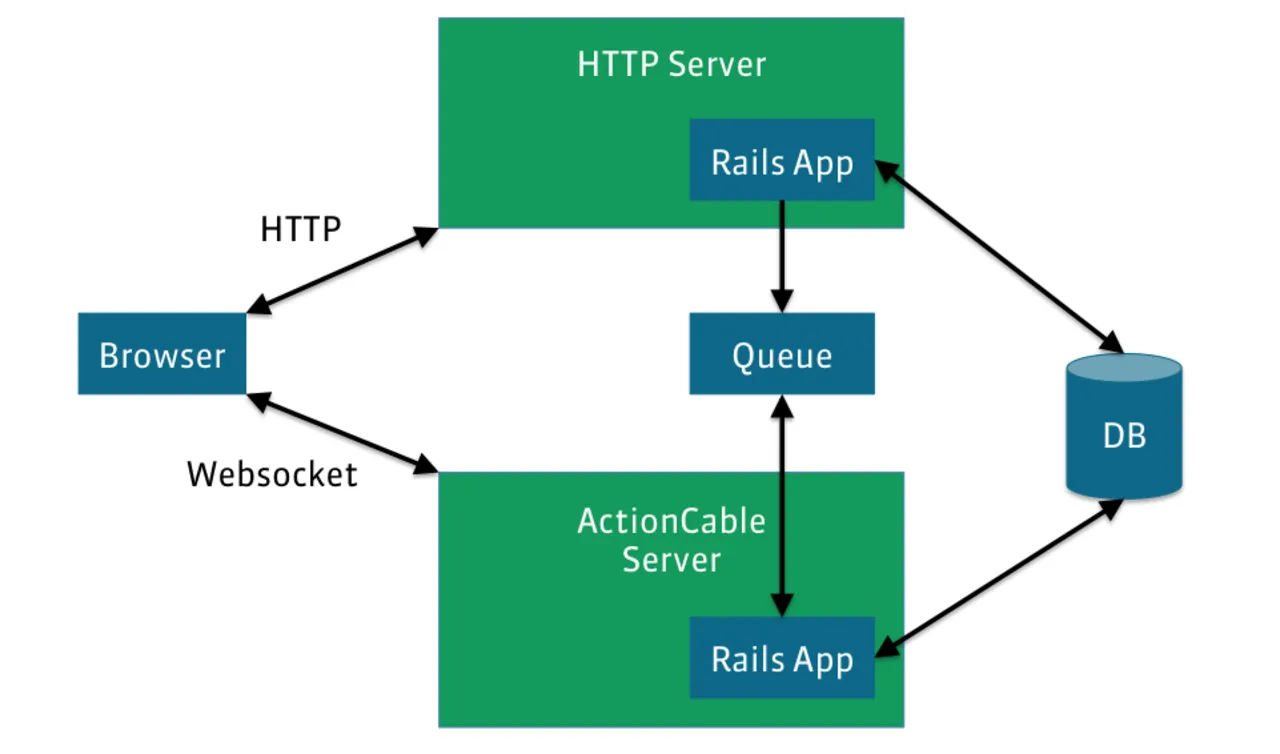
As such, ActionCable does not hook into the typical Rails MVC handling of requests, but adds another entry point to a Rails application - the ActionCable server: This server is, as of now, started as a different process dedicated to handling multiple open websocket connections while loading all components of the Rails application and providing developers the comfort of using its components. The Rails server will propagate messages to the ActionCable server by pushing them to a queue that the ActionCable server is listening to. In the current implementation, this role is given to a Redis instance.
We can explore the architecture and the way communication works between the components using the example of a chat application: It allows multiple users to connect to it and send messages to each other. Users receive messages from other users immediately i.e. users will not need to refresh the browser to see a new message but see it pop up at the end of the message list. You know, a chat like you would expect.
Let's trace one possible way of propagation of a user’s message:
- A user opens the page in her browser which in turn opens a websocket connection to the ActionCable server (Websocket).
- A user sends the message by remote form submission to the Rails server (HTTP).
- The Rails server persists the message and publishes a message including the user and the message body to the queue. It sends an acknowledgement to the user. This ends the HTTP request.
- The ActionCable server receives the published message from the queue. It publishes the user and message body to all relevant open websocket connections.
- All relevant browsers connected to the ActionCable server receive the message and show it in the DOM.
To allow for differentiation between different groups of users, ActionCable uses the concept of channels: A user may subscribe to a select few of all available channels and thus only receive messages meant for the given channels. If the chat application were to have multiple "rooms", a user could subscribe to each room via a designated channel.
On the technical side, ActionCable uses EventMachine to handle connections and spawns a new Ruby thread for handling messages. This means that an ActionCable server will need to be multi-threaded - we will use puma for that.
Building a chat with ActionCable
The following sections will introduce the most important points of developing a simple chat based application using ActionCable as a publisher of messages by users. We will skip the basic Rails setup and user authentication (which is done by using OmniAuth and its developer strategy) - if you want to follow along at home you may start by checking out the example repo where this is already taken care of. Note that you will need Redis installed and running.
git clone git@github.com:stsc3000/actioncable-chat.gitcd actioncable-chatgit checkout startbundlerake db:setuprails s
Getting started
We begin the development of the application with the following in place:
- We've got a user model along with an authentication flow using the omniauth development strategy.
- We've got a message model along with a controller and a view that lists the most recent messages and allows us to post new messages. Upon submitting a form for a new message the controller will redirect to the same view. The user will only get to see new messages by other users when refreshing or submitting a new message.
Adding ActionCable
ActionCable is still in development - thus we have to do a bit of legwork to integrate it into our application. A prerequisite is a running redis service (here on port 6379).
- We start by adding the required gems and running bundle install:
- Next up we add configuration for starting the ActionCable Server:
- Then we add the base classes which we will use to define our own messages channel:
- ApplicationCable::Connection defines how ActionCable identifies a user: The example given in the ActionCable docs is to do this by reading a signed cookie which is set upon login in the Rails app. This requires the ActionCable server and the Rails app to share cookies, for example by running on the same domain.
- Lastly we add the JS libraries for ActionCable integration to our manifest.
Sending and Receiving Messages
We will have to send and receive messages via JavaScript in order to get rid of that nasty refreshing issue. Let's start with submitting the message form via AJAX. We will use sprockets-es6 to integrate the current JavaScript standard.
Next, we serialize the form data upon submitting the form and send it to the create action of the messages controller. The create action no longer redirects, but acknowledges the creation of the message.
In order to receive and display messages we will make the browser listen to a channel, called messages which will propagate new messages. In order to do that, we make use of the JavaScript library of ActionCable and create a listener:
Upon receiving a message on the channel, it will publish a jQuery event which causes the appending of the message to the DOM.
On the server-side we will have to create a channel which the browser can subscribe to and publish messages to it. For now, the channel is mostly empty since it acts as a simple relay:
We will publish messages to clients from the MessagesController. ActionCable will automatically convert the given arguments to JSON.
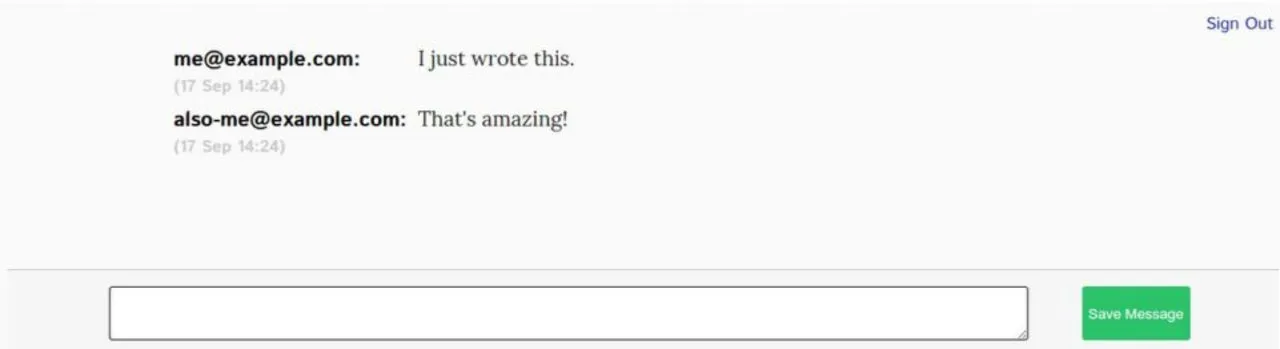
With this being done, we have a working, albeit simple, chat that we can use. In order to get it running we have to start our application server and the ActionCable server:
If you now open localhost:3000 in two browser windows, enter any credentials and post messages, you should see them appearing instantly over all windows. You may also inspect the websocket connection in your dev tools of choice to see how everything works.
Sending Messages via ActionCable
As you probably already guessed you can do more than only listening to a channel. There are hooks for knowing when a client subscribed or unsubscribed and you may define actions on the channel itself. These actions are triggered by the browser through the websocket connection. Let's examine this by sending our message via the messages channel:
As you can see the MessagesChannel#send_message action is very similiar to our controller action (which we can remove at this point). After defining the action on the MessagesChannel we can add it to our client:
And finally we can clean up the sending of messages:
That was pretty railsy
We think ActionCable integrates nicely into the rest of the Rails framework, evading the impedance mismatch caused by using more makeshift solutions. Despite its currently unfinished state its direction and usage seem clear enough to give hope to successful production deployments in the future.